
Wheat’s Tigers emerge from a woodlot in Northern Virginia and approach a plowed field in this 15mm Civil War vignette by author and blogger Scott L. Mingus, Sr.
I enjoy crowding my battlefields with fences and trees, as well as crop fields and pastures. The more, the better, in my opinion, especially for Eastern Theater actions. However, I never have enough fencing or trees, so I have over the years constructed a lot of low cost trees / woodlots to fill in around my rather expensive trees I made from several Woodland Scenics tree kits. Here is a step-by-step guide to how I make decent-looking tree stands for low cost and minimal time. This process can be used for mass production of cheap background trees for dioramas, wargaming, or model railroads.

Here are the basic supplies I use to create fairly realistic stands of timber for my wargaming tabletop. I start with cheap plastic credit cards or other waste products, including these large black inserts for 3-ring binders that I recycle as the bases for the woodlots. Other needs are paint, flocking, roofing nails, and old sponges / foam / clump foliage or similar item to use as the tree body itself. The nails will serve as the trunk, and will be OK using the “2-foot rule.”
The yellow thing with the string in the upper right is a “quacker” duck call given to all tourists who Ride the Ducks, a Baltimore Harbor and city tour in World War II amphibious “Ducks”.

I cut the plastic cards / inserts into various shapes and sizes as the base for my woodlots. I hammer cheap roofing nails through the plastic card as the “tree trunks.” 54mm ACW figures are Americana imports from a tourist shop in Gettysburg and are from my grandson’s collection (I start him young!!!!). The plastic wagon with the red roof is an old 1960s toy Wild West wagon I received as a gift when I was a child not much older than my grandson.

I paint the roofing nails black, and then dry brush the trunks with lighter highlights near the base.

Form the tree canopy from clump foliage, old sponges, clay, styrofoam, or whatever you have laying around that is easy to shape. Paint and flock the tree so it looks OK, adding highlights of a lighter shade occasionally to look like sunlight is striking the leaves. Figures are AB / Battle Honors 15mm Iron Brigade painted by Larry Reber.

Next, I paint the plastic base with a cheap green latex hobby paint (in this case, a $0.79 bottle of Forest Green from the local West York Wal-Mart). Make sure to lay it down thickly.

While the green paint is still wet, I dip the stand into a flocking mixture (I use a lot of colors and debris in moderation to create a more realistic look than just using plain green flocking). I allow the paint to dry thoroughly, and then shake off the excess flocking.
The 54mm Native American figure was a generous hand-painted gift given to me by English wargamer Jim Conquer as his thanks for a private Gettysburg Battlefield tour I gave him a couple of summers ago – it is superbly painted!

The stand of model timber is taking shape! I add ground effects with items I pick up in my yard — bits of mulch, small pebbles that look like model rocks, twigs, etc. These are glued onto the stand, along with small clumps of foliage and lichen as bushes, underbrush, etc. My little grandson loves to put the bushes into the wet glue. I use Allene’s Glue, again a Wal-Mart pickup from their craft section. It’s thicker than Elmer’s Glue and works better. It also dries much faster.
The small vignette on my box of cavalry and entrenchments is a 15mm paper model of the Lutheran Theological Seminary at Gettysburg. The model was created by Florida gamer David Glenn, Jr., who is also the artist who drew the seminary. Black-and-white templates for the miniature seminary appeared in a past issue of the hard copy Charge! newsletter.

Here is the finished miniature woodlot — note the rounded edges, which I left for the viewer so you could see the model we just made. In actual use, I would cover the edges with a dusting of flocking powder to make them blend into the general terrain.
Figures are 15mm Wheat’s Louisiana Tigers from Larry Reber. The stream is from Doug Kline at Battlefield Terrain Concepts, with added foliage, rocks, and debris added by Scott Mingus. The plowed field is from Miniature World Maker, an Australian company that I first used back in the 1990s when I still lived near Cleveland. The stone wall and rider fence is by Scott Mingus (another cheap project — matchsticks and kitty litter!). I need to blackwash it…
Total cost per stand is less than a quarter, assuming I use Woodland Scenics clump foliage (the most expensive component). It’s less with old sponges or other material, but they take more time.
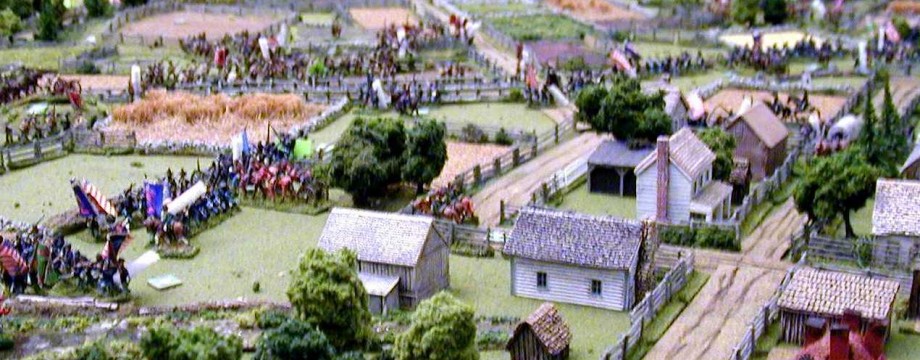
Several of these cheap tree stands can be seen in my 15mm Battle of South Mountain.
Why not send me YOUR low cost budget Civil War terrain ideas and step-by-step photographs of the process you use!! Debi and I at the Johnny Reb Gaming Society welcome your submissions of visual examples of your creativity!

By the way, some folks have recommended filing off the sharp tip of the nail to reduce injuries if someone stumbles and puts their hand on a tree stand to correct their balance. Ouch!
hi i found out that using tree roots in all scale makes good trees . special for late fall .. without leaves. as a civil war reeanctor , i build 1/72nd scale to 1/16 scale dioramas . in order to make these trees, dig up small trees of any size. wit h a 5 gallon pail of water soak them until all the dirt comes off .then you may glue some leaves or just leave them natual . they work relly good roland gagne
Your civil war scenes look fascinating. I have been a model railroder for more than 34 years and I never stop learning. The great thing about model railroading is the variety the hobby has to offer. Everything from the technical side (like track planning), electronics (like wiring), the creative side (like scenery), woodworking (like building structures), and the fun side (train operation). Although in saying that it is all fun and certainly challenging at times.